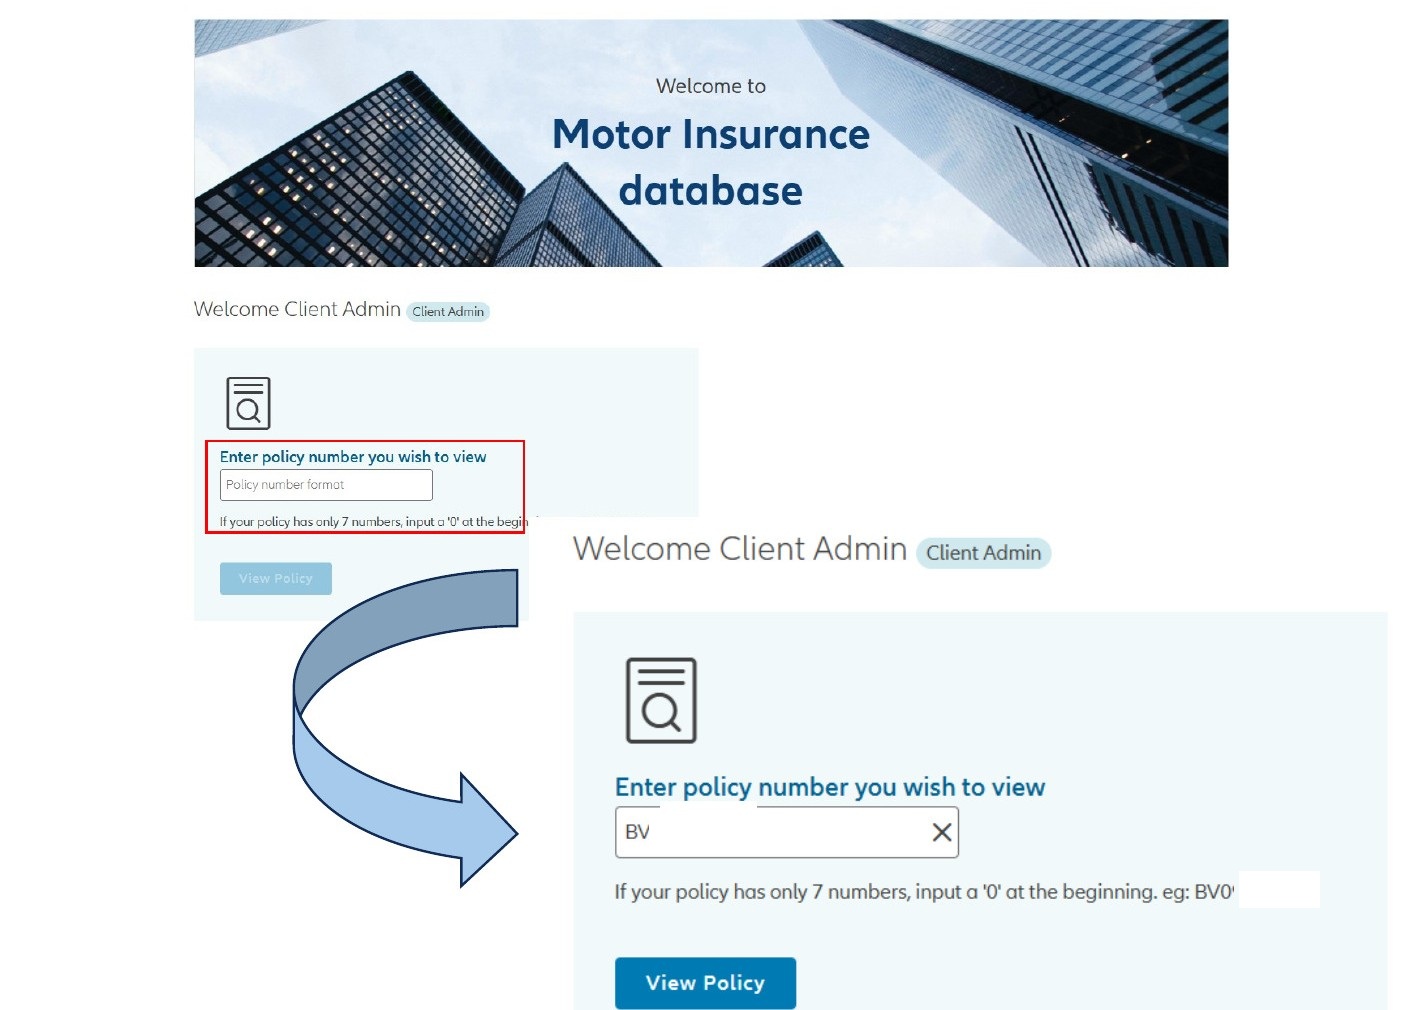
1. Once logged in to the MID, enter the policy number in the text box and click ‘View Policy’. If the policy only has 7 numbers, enter a ‘0’ after the policy prefix. 

Note: when a Client is logged into the MID but is inactive, after 20 minutes the system will timeout and the user will have to log back in again. 

MID log page

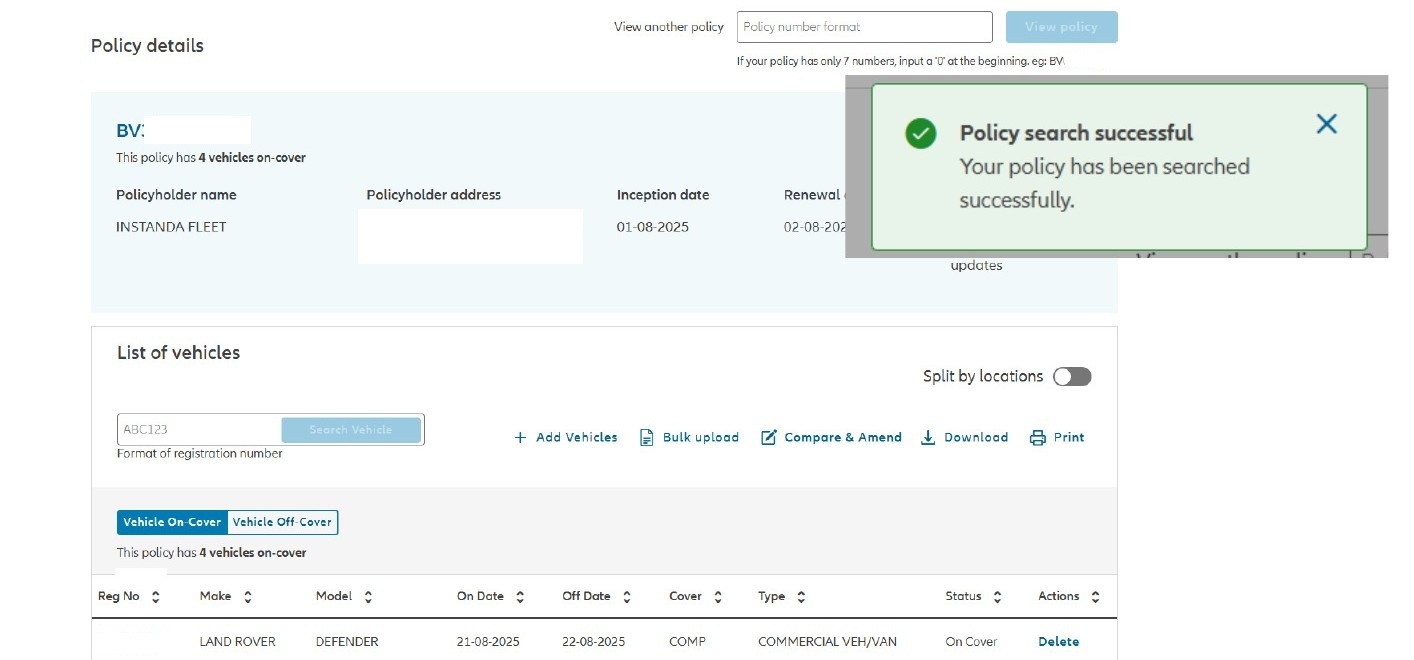
2. After inputting the policy number, a dialogue box will open to inform you that the search has been successful. The below screen will then show detailing policy and vehicle information. 

MID details screen

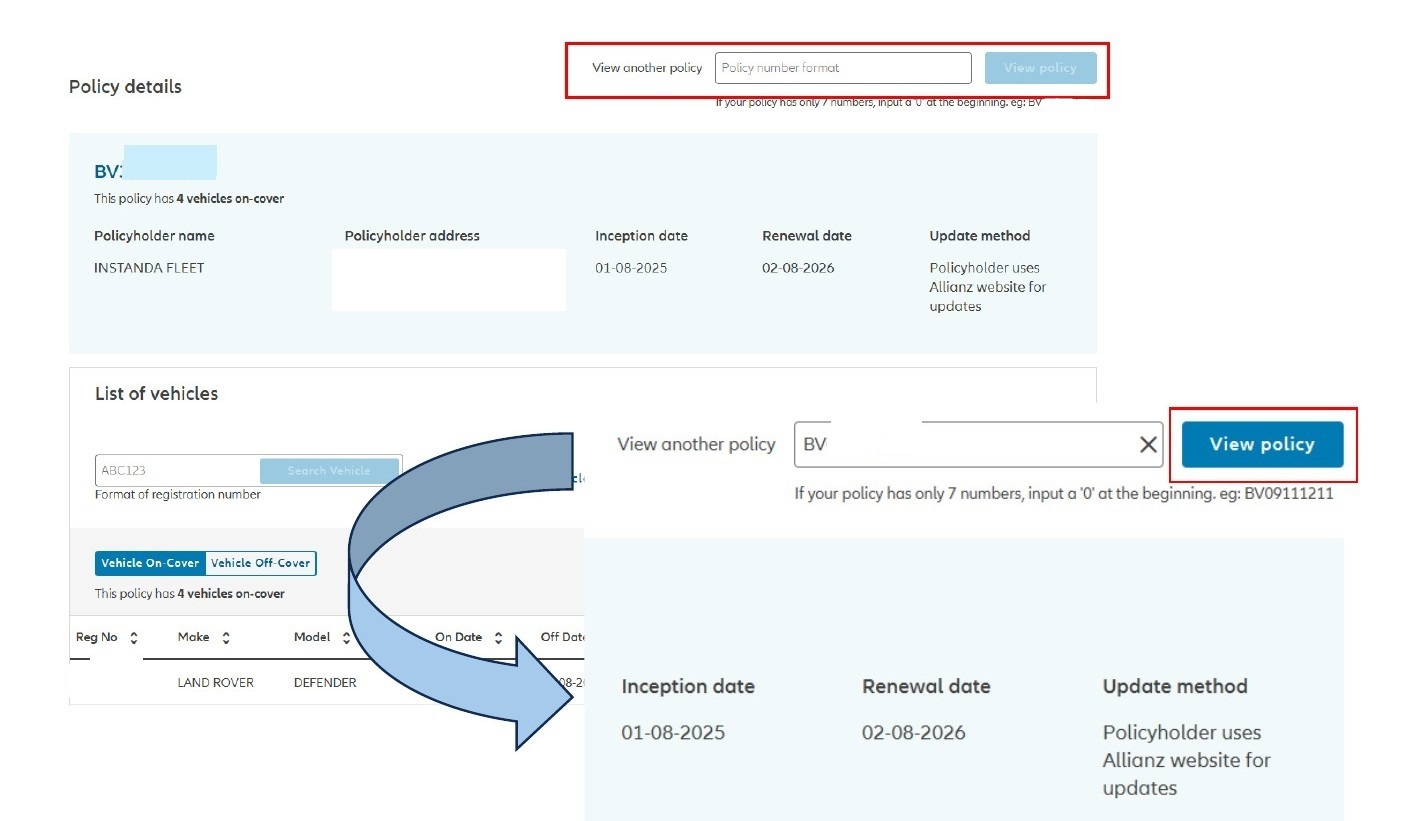
3. To search for a different policy from the Policy details screen, enter the policy number in the text box in the top right-hand corner of the screen and click ‘View Policy’. 

view another policy search

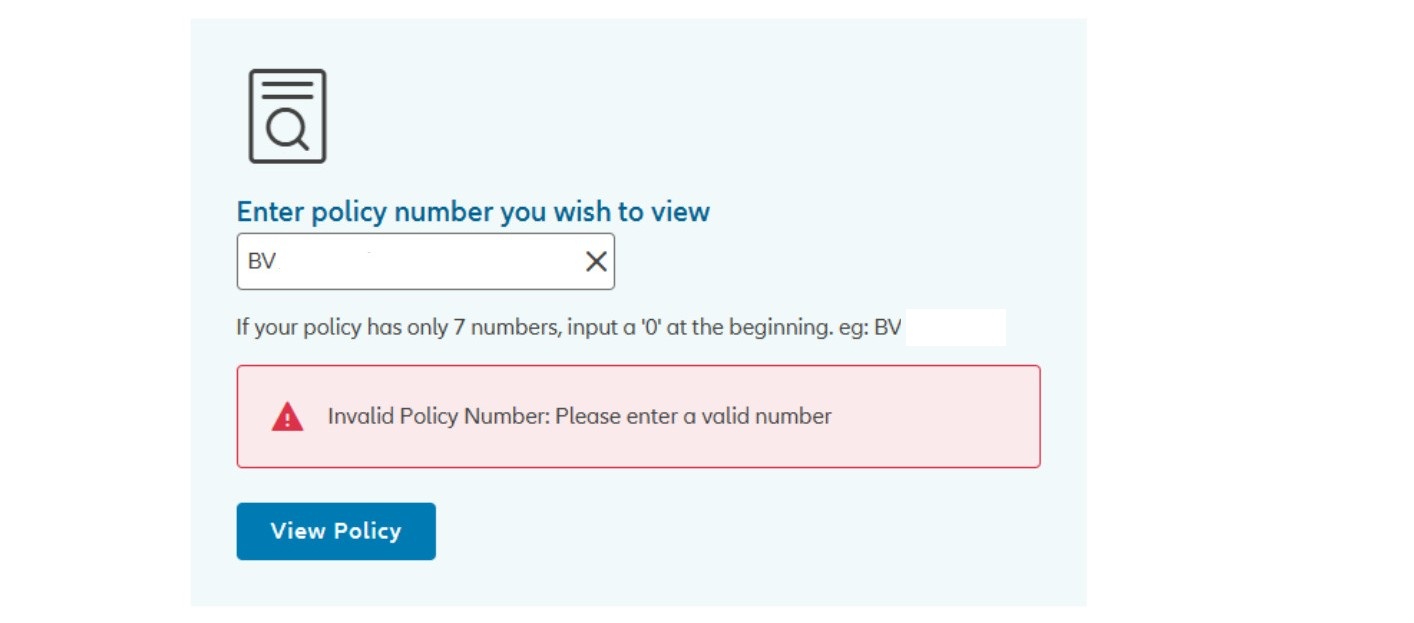
4. If a policy cannot be found or an error message is received, check with the organisation administrator to ensure access has been granted and then escalate to the MID Help Desk.

Note: the other possible error messages which can appear when searching are:

-          Policy cannot be accessed through MID Portal

-          Policy is no longer a current policy/ is inactive

-          Policy cannot be fetched due to connectivity issues

-          Policy has been removed from the system

-          Client does not have access to the policy number which they entered

Note: the following prefixes can be searched for:

-          BV0, BV1, BV2, SM, IJ, IQ (Coronet Policies)

-          BV3 onwards (Instanda Policies)

invalid policy number

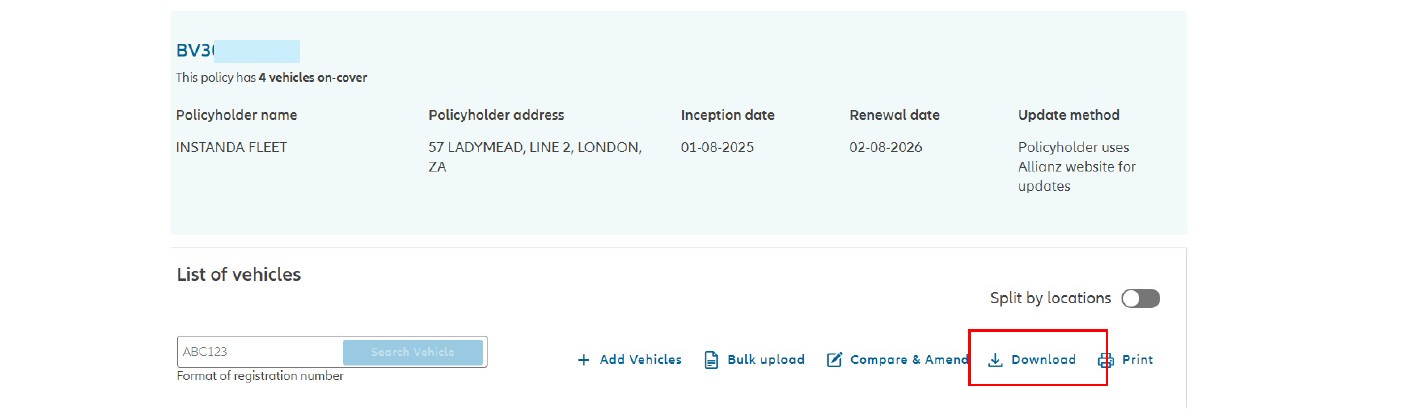
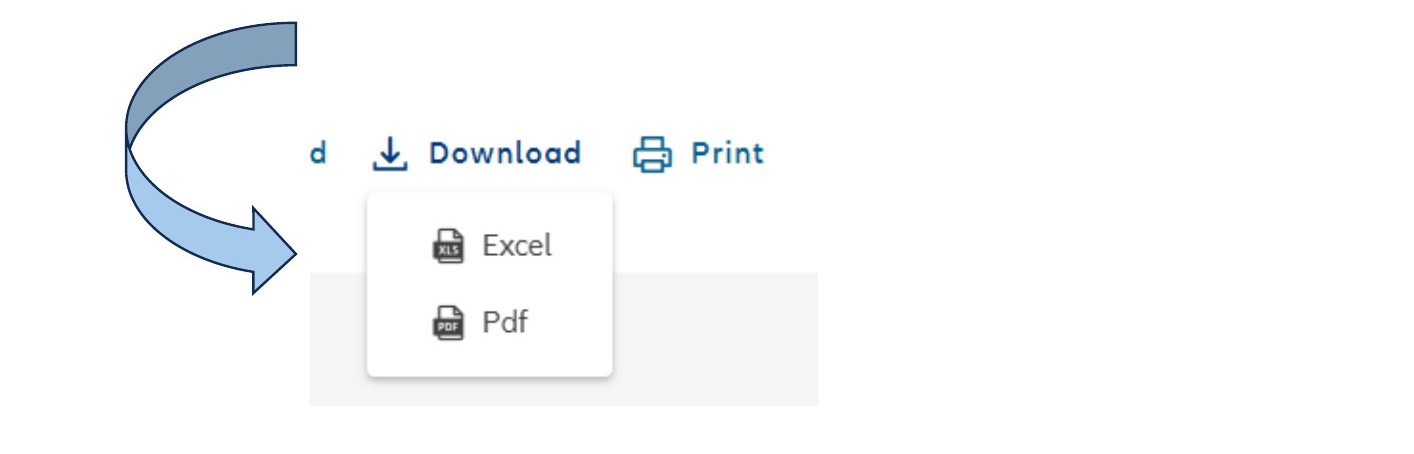
1. On the Policy details page click on ‘Download’. Then click on ‘Excel’ or ‘PDF’ depending on the required format. The schedule will then appear in your downloads. 

download list
download pdf

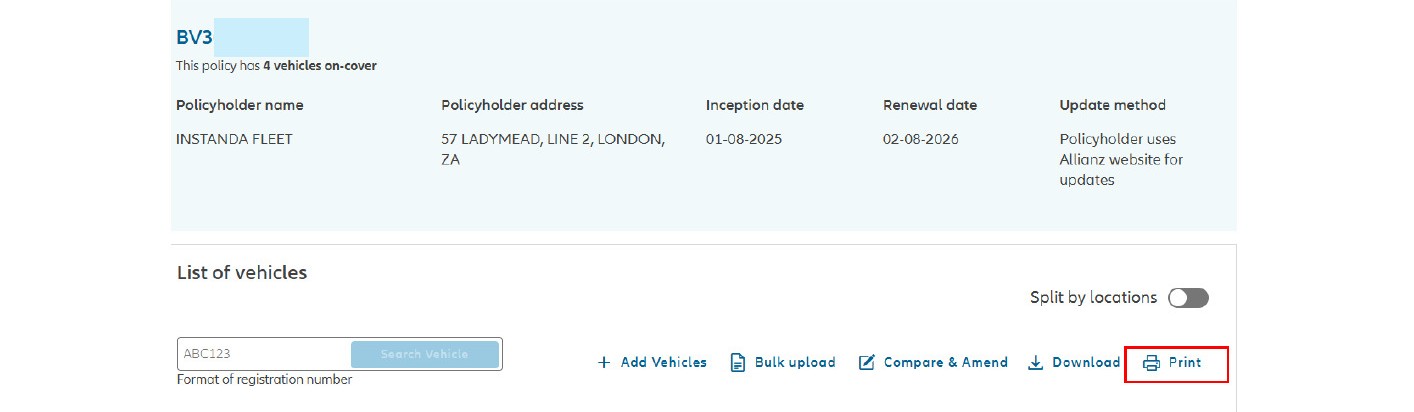
1. On the policy details page click on ‘Print’.

Note: if filters have been applied and there are no vehicles in the filtered view the ‘Print Current View’ option will be disabled. Printing will still be permitted for the entire schedule. 

print vehicle details

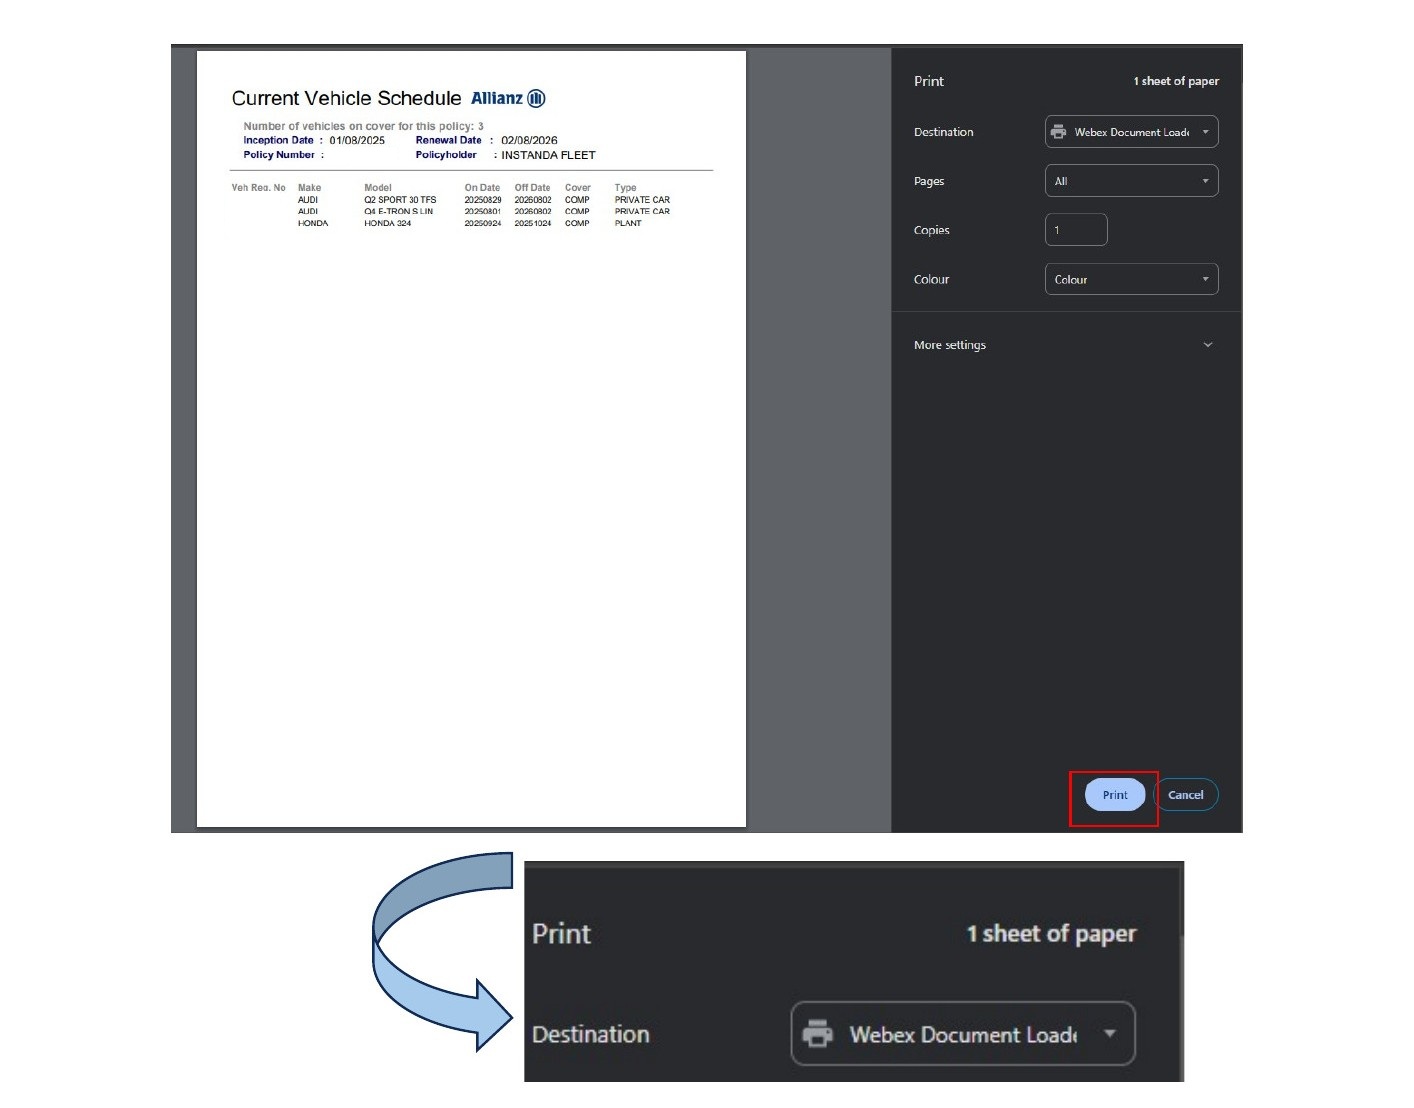
2. This will bring up the Print Screen. Select the required printer from the ‘Destination’ drop down box. Then click ‘Save’ to print. 

printing details

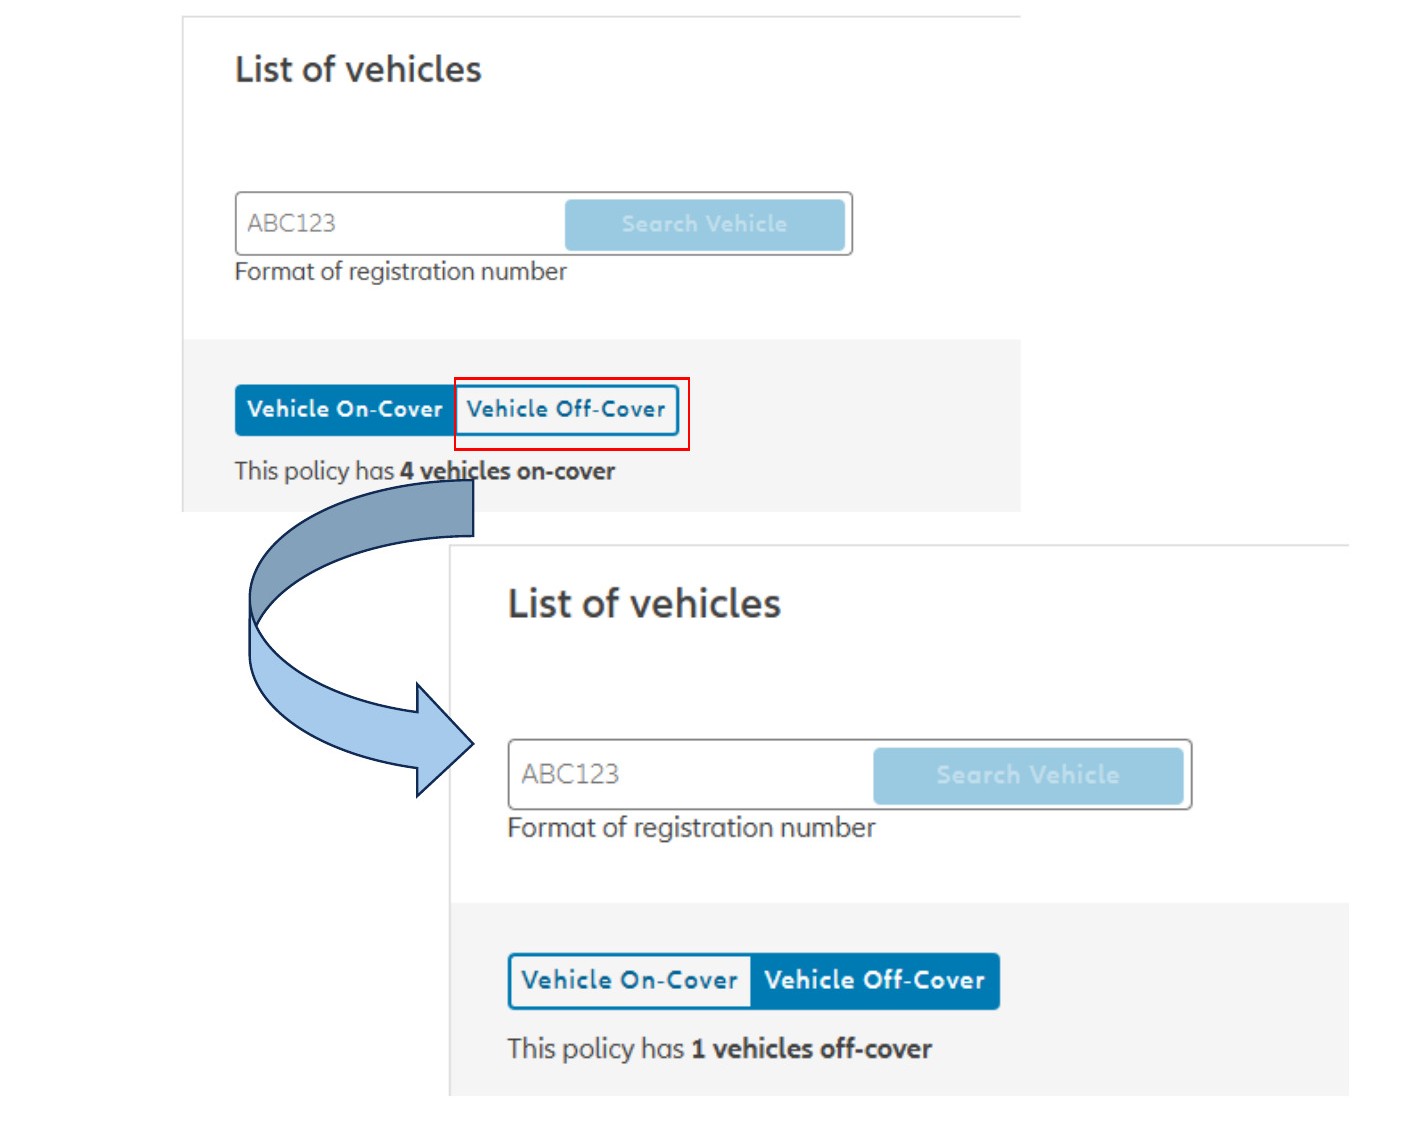
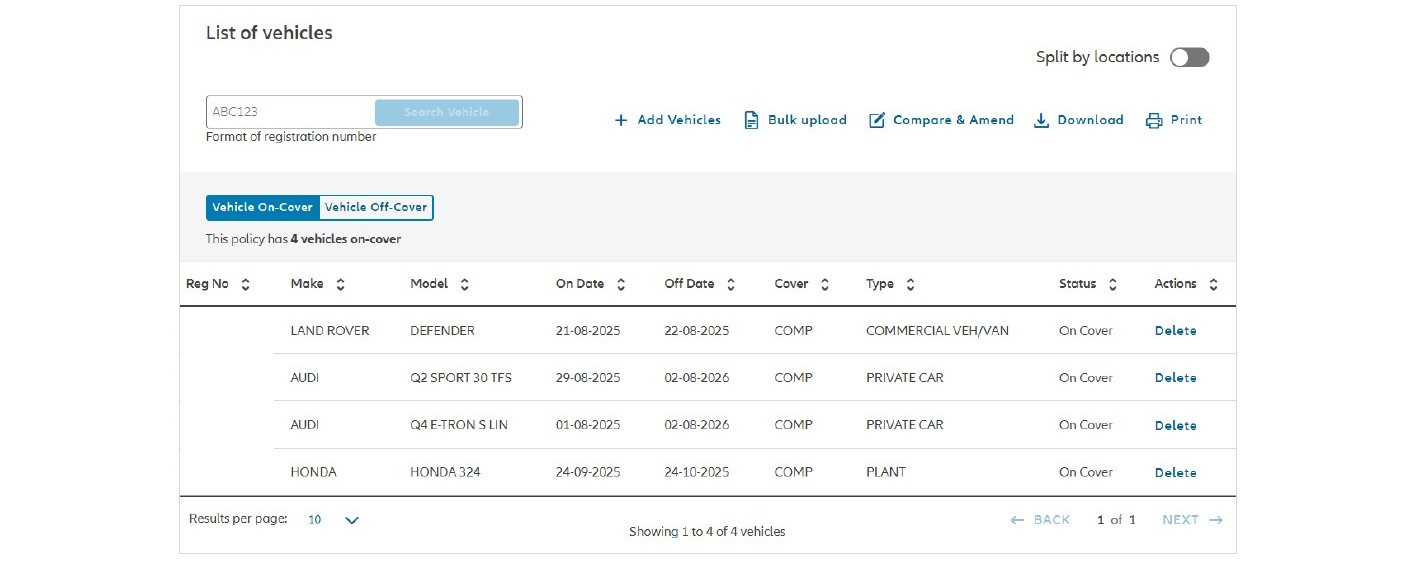
1. On the Policy details page the system will automatically show vehicles which are On-Cover; there will be a note detailing how many vehicles are currently On-Cover. Click on ‘Vehicle Off-Cover’ to show vehicles which are Off-Cover. 

list of vehicles


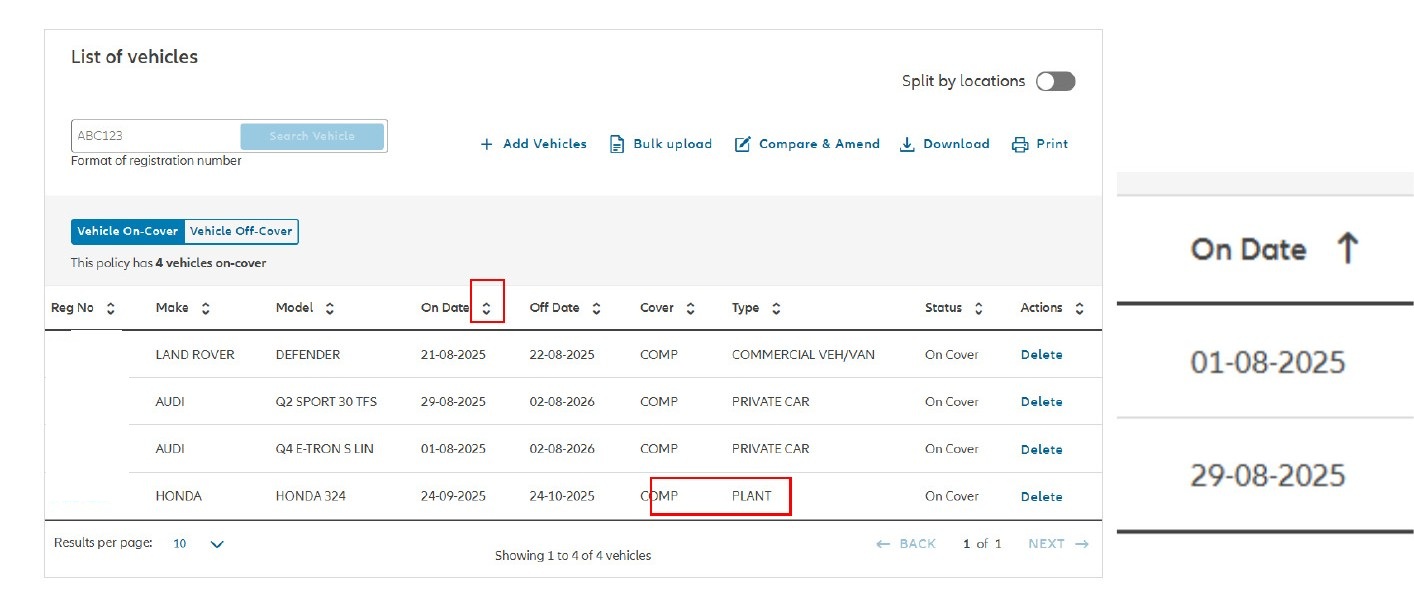
1. On the Policy details page click on the arrows next to the date the vehicles need to be sorted by (‘On Date’ or ‘Off Date’). This will sort the vehicles by the oldest date first, click on the arrow again to sort by newest date first. 


sort vehicle by date

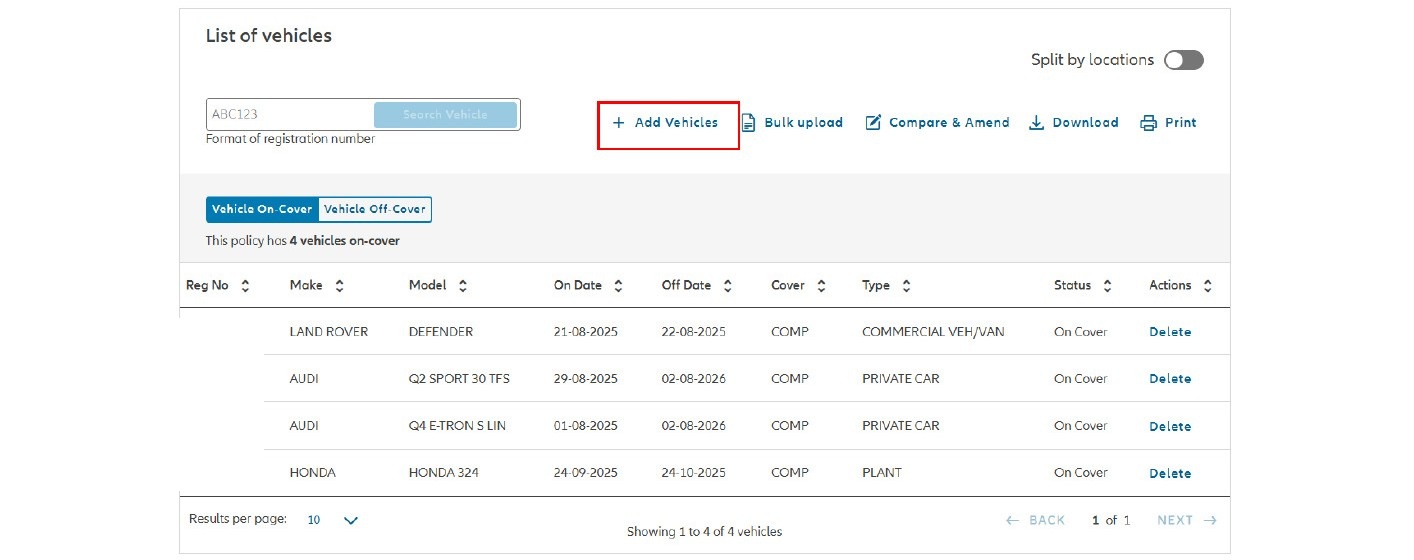
1.On the Policy details page click on ‘Add Vehicles’. 

add vehicle

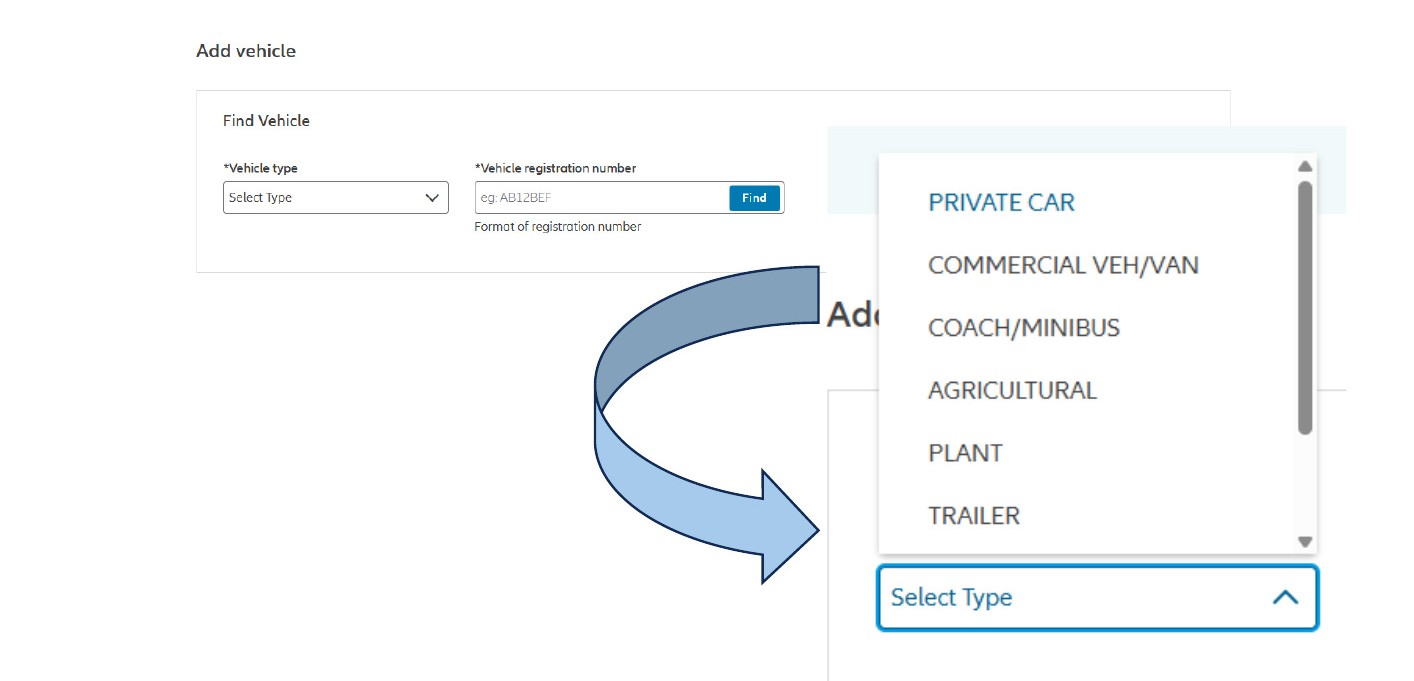
2. Select vehicle type from the drop-down box and enter the registration number.

Note: if adding or amending a vehicle which has a private registration and this registration number has previously been attached to a vehicle which has been added to the MID the MID Help Desk will need to be contacted to add this vehicle. 

car type to add

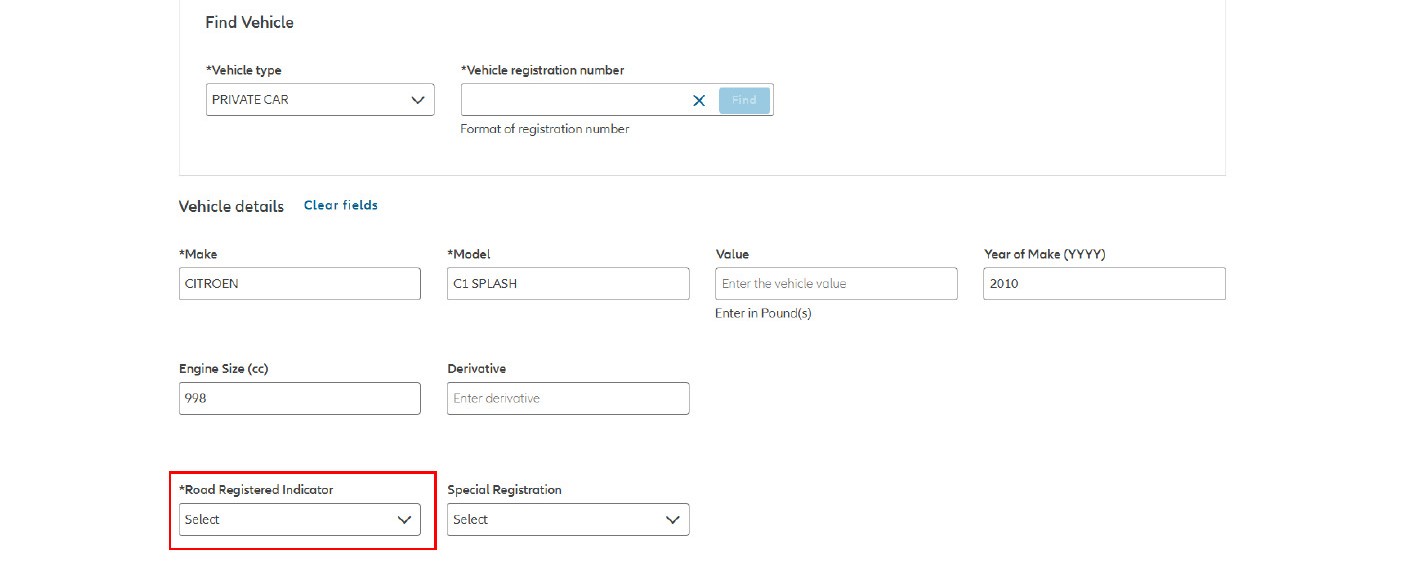
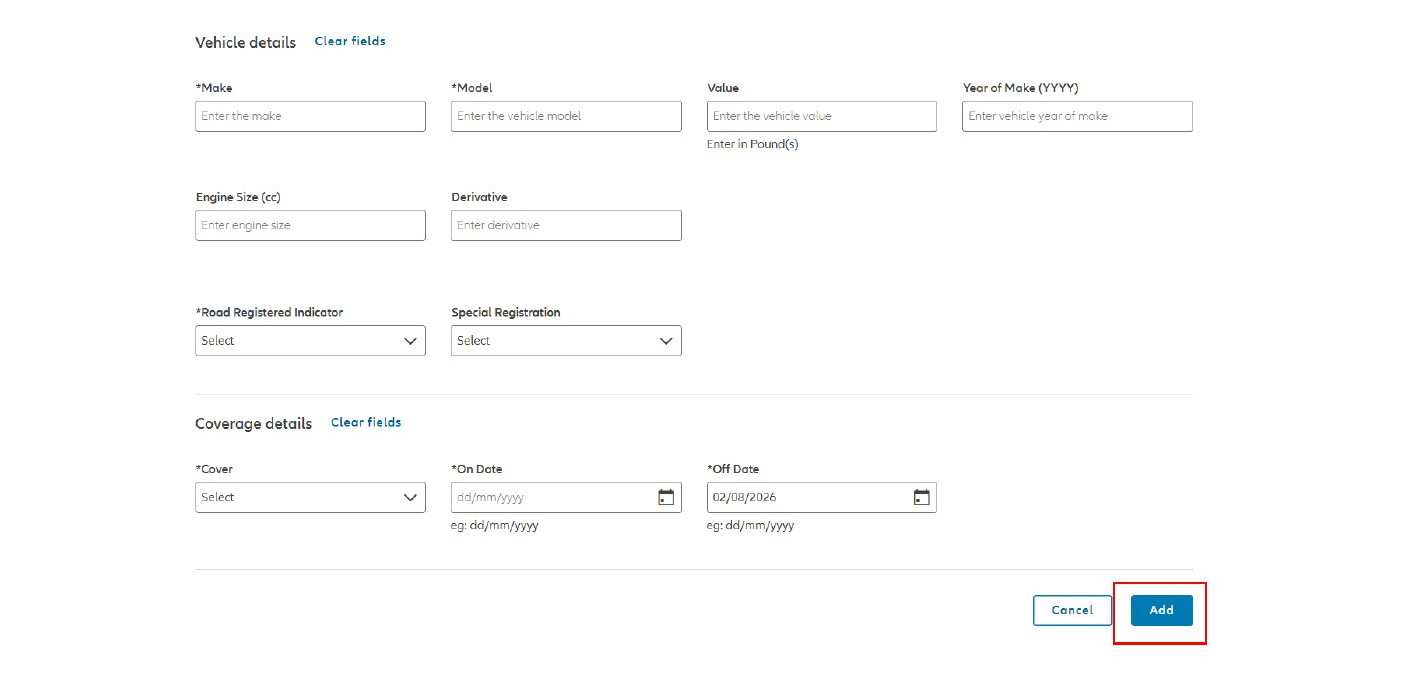
3 .Fill in the fields marked with an *. The system will automatically update the Make and Model of the vehicle. The Road Registered Indicator (whether the vehicle is registered with the DVLA to drive on the road) will need to be filled in manually. 

add vehicle

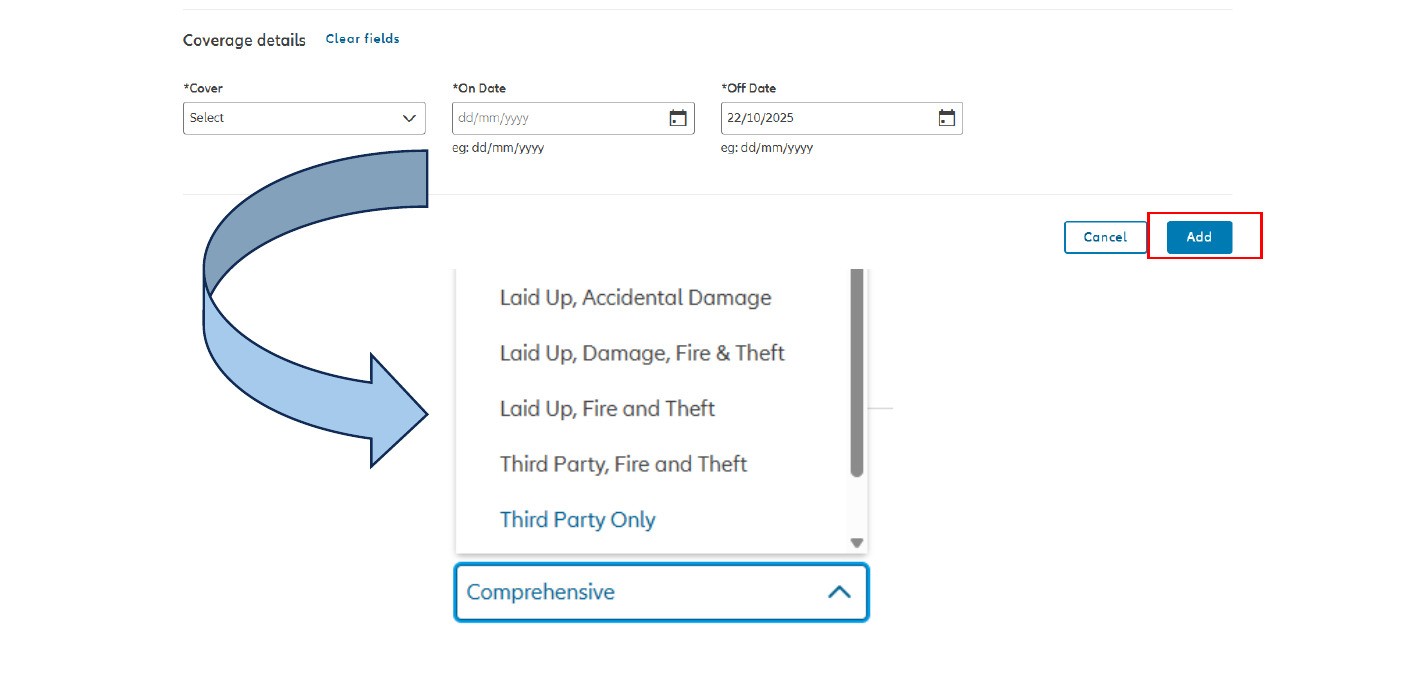
4. Select the cover for the vehicle from the drop-down box and input the ‘On Date’ and ‘Off Date’ for the vehicle. Then click ‘Add’ to add the vehicle to the MID.

Note: if a Client calls the MID Help Desk with an issue the Help Desk will need to check that the user has permissions to add vehicles. This is done by:

-          Checking the FGPs for the user

-          Checking the update method for the policy

cover type

1. On the Policy details page click on ‘Add Vehicles’. 

add vehicle

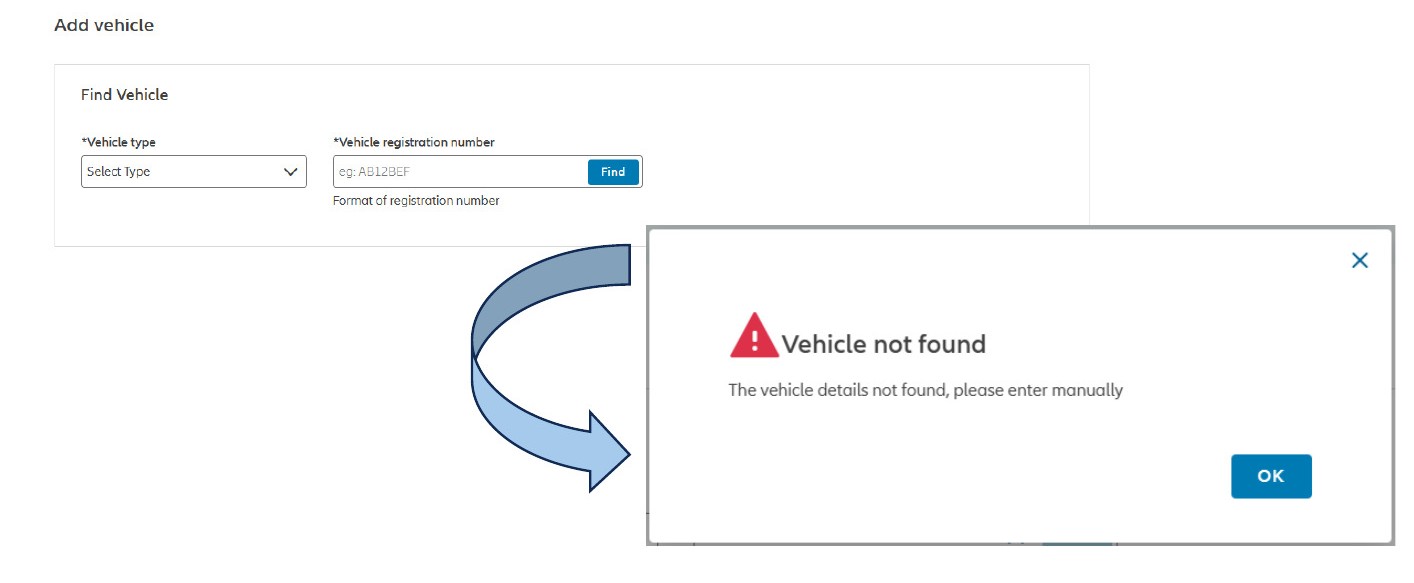
2. Select vehicle type from the drop-down box and enter the vehicle registration number. If the vehicle registration number is not found, click on ‘OK’ to add the vehicle manually.

Note: if adding or amending a vehicle which has a private registration number and this registration number has previously been attached to a vehicle which has been added to the MID the MID Help Desk will need to be contacted to add this vehicle. 

vehicle not found

3.Enter the vehicle details and click ‘Add’. 

road registered idicator

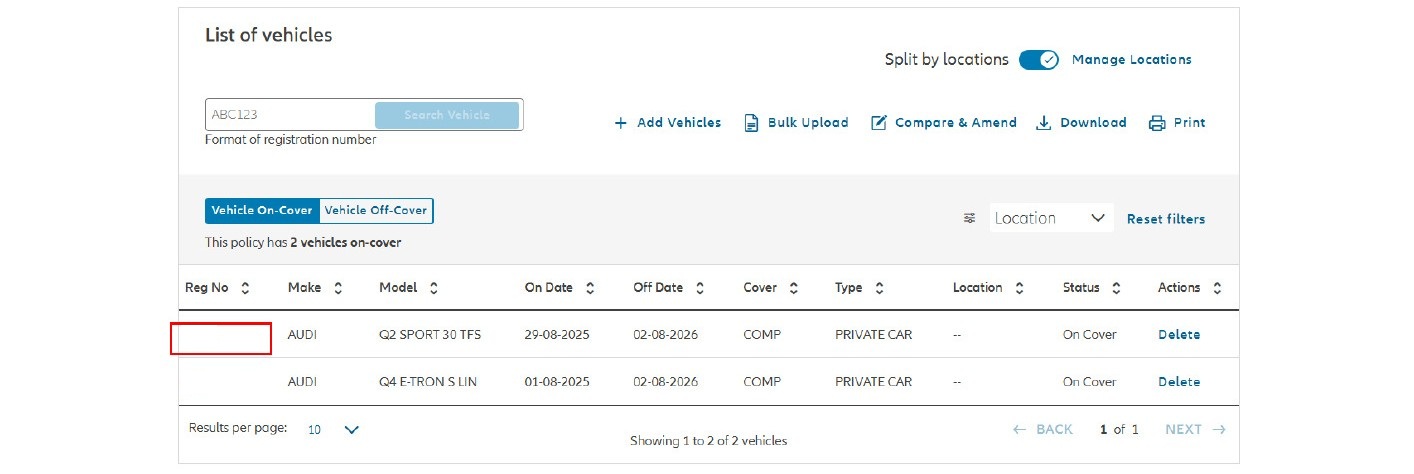
1. On the policy details page click on the relevant vehicle registration number. 

relevant vehicles

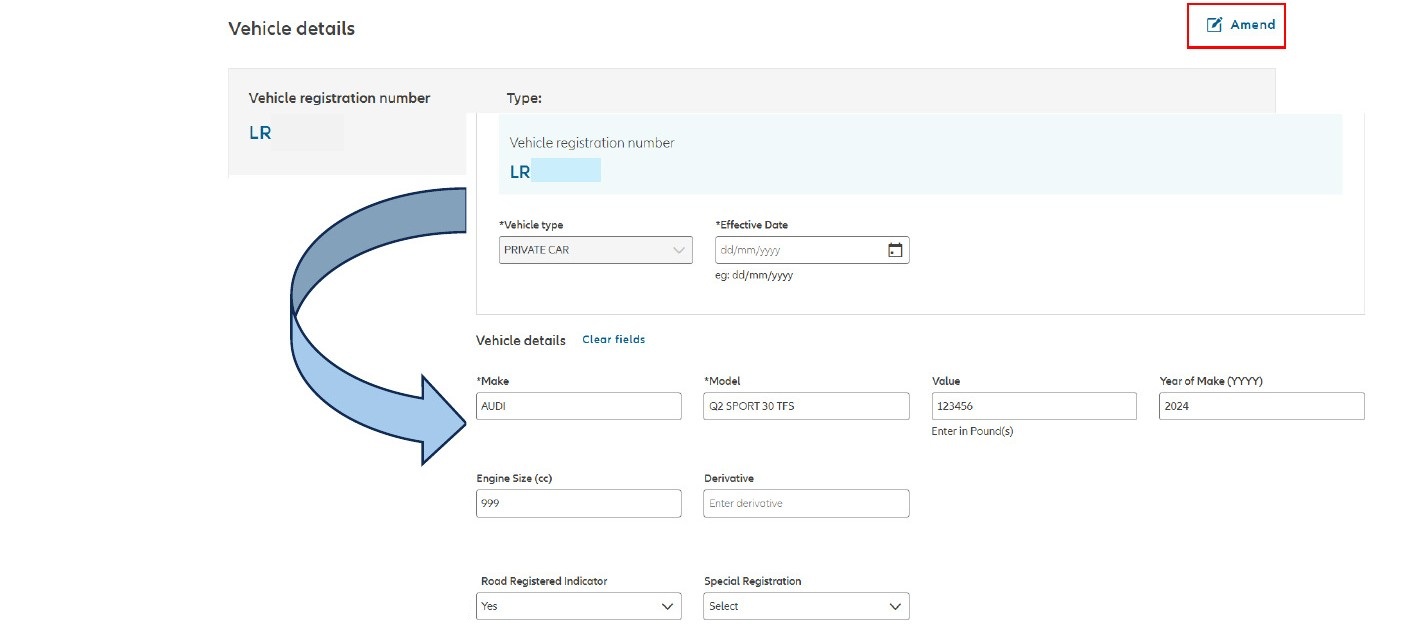
2.Click on ‘Amend’. This will allow vehicle details to be amended.

Note: if adding or amending a vehicle which has a private registration number and this registration number has previously been attached to a vehicle which has been added to the MID the MID Help Desk will need to be contacted to add this vehicle. 

vehicle details page

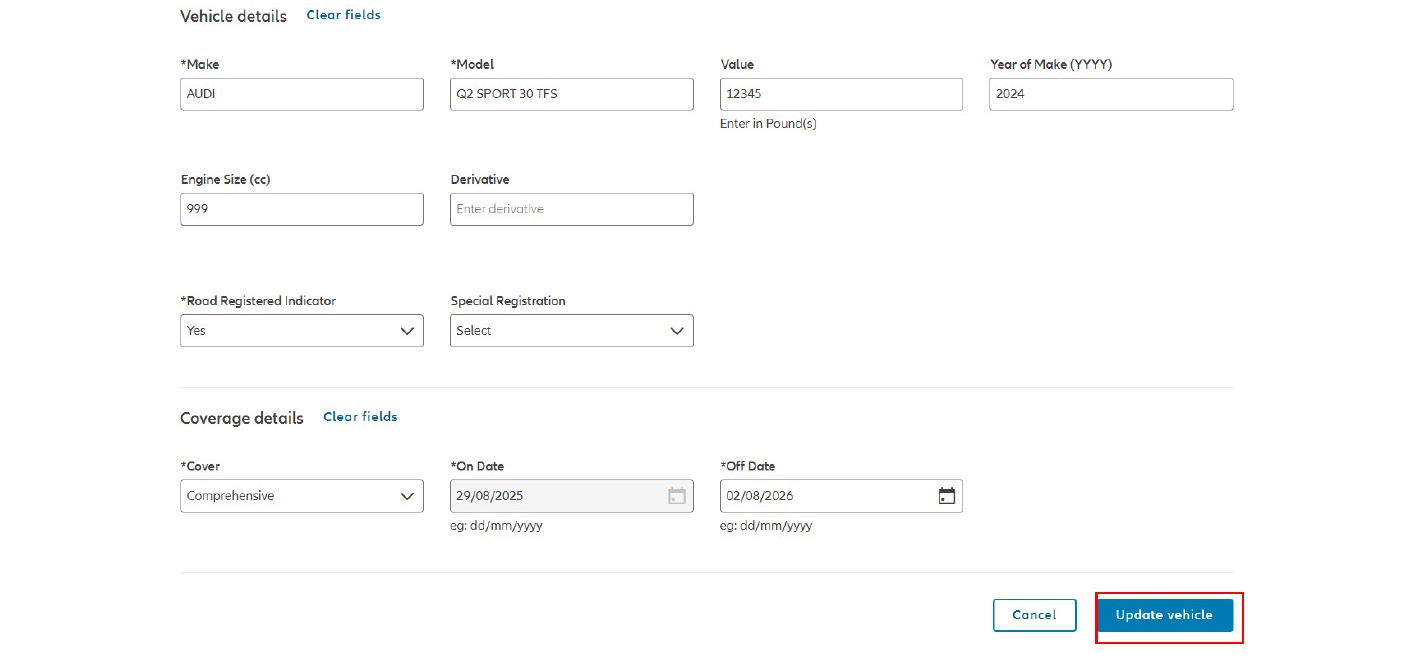
3.Click on ‘Update vehicle’ once the amendments have been made to save any changes.

Note: only vehicles on a Coronet policy can be edited. Vehicles on an Instanda policy cannot be edited. Internal users will be able to edit the cover types and cover dates. External users will only be able to edit cover types. 

update vehicle

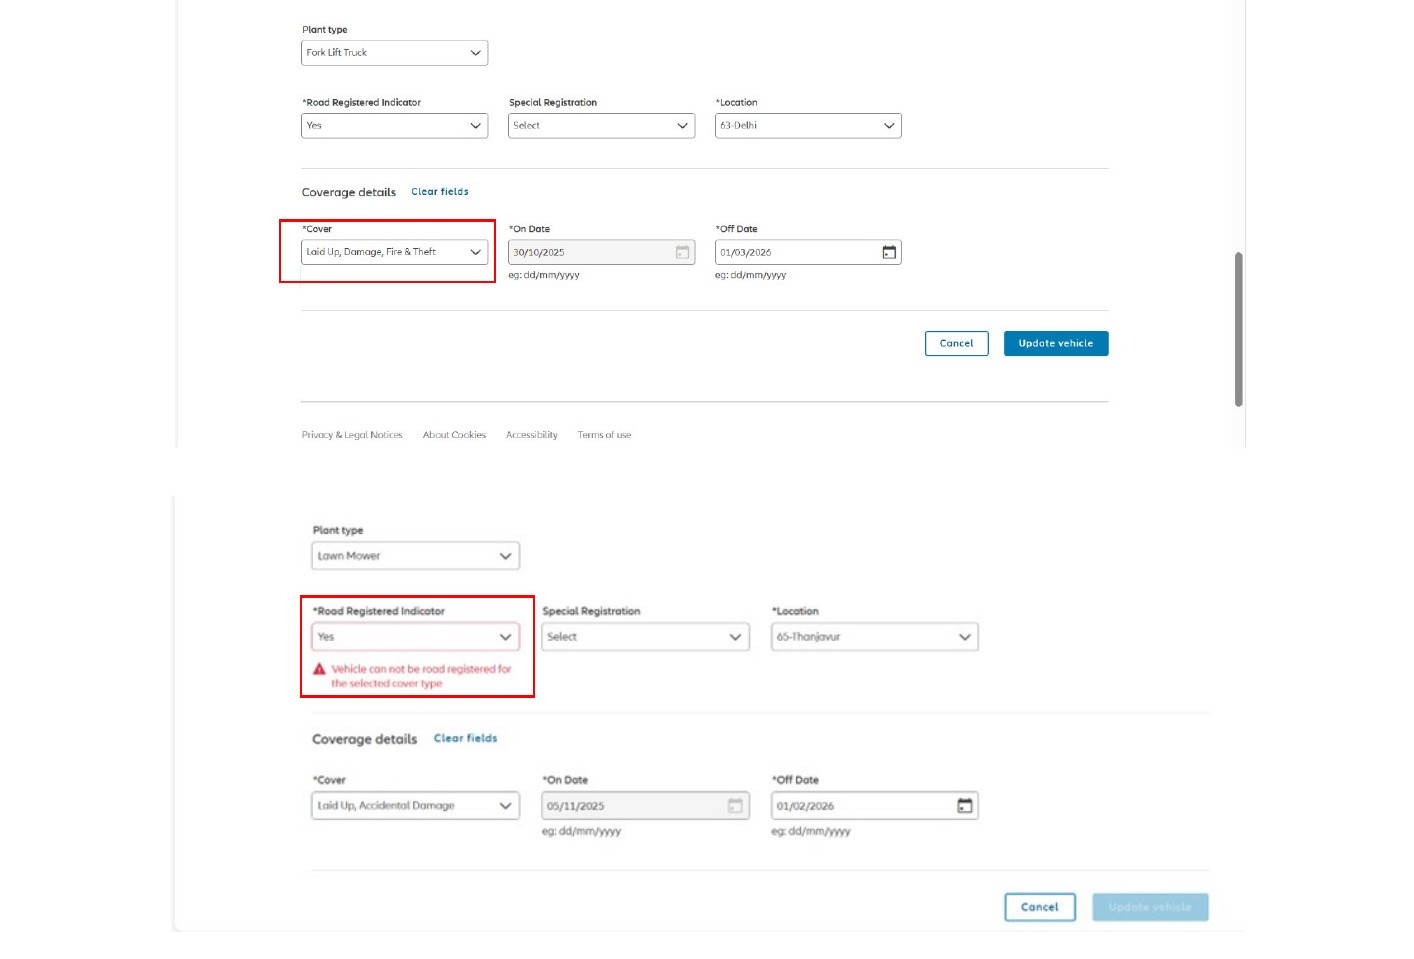
4. When amending vehicle details, if the cover type is changed to any version of ‘laid up’ an error message will appear if ‘Y’ is selected for ‘Road Registered Indicator’ and the ‘Update vehicle’ button will be greyed out until the cover type or Road Registered Indicator is amended correctly.

Note: the error message will read ‘Vehicle cannot be road registered for the selected cover type’.

cover type

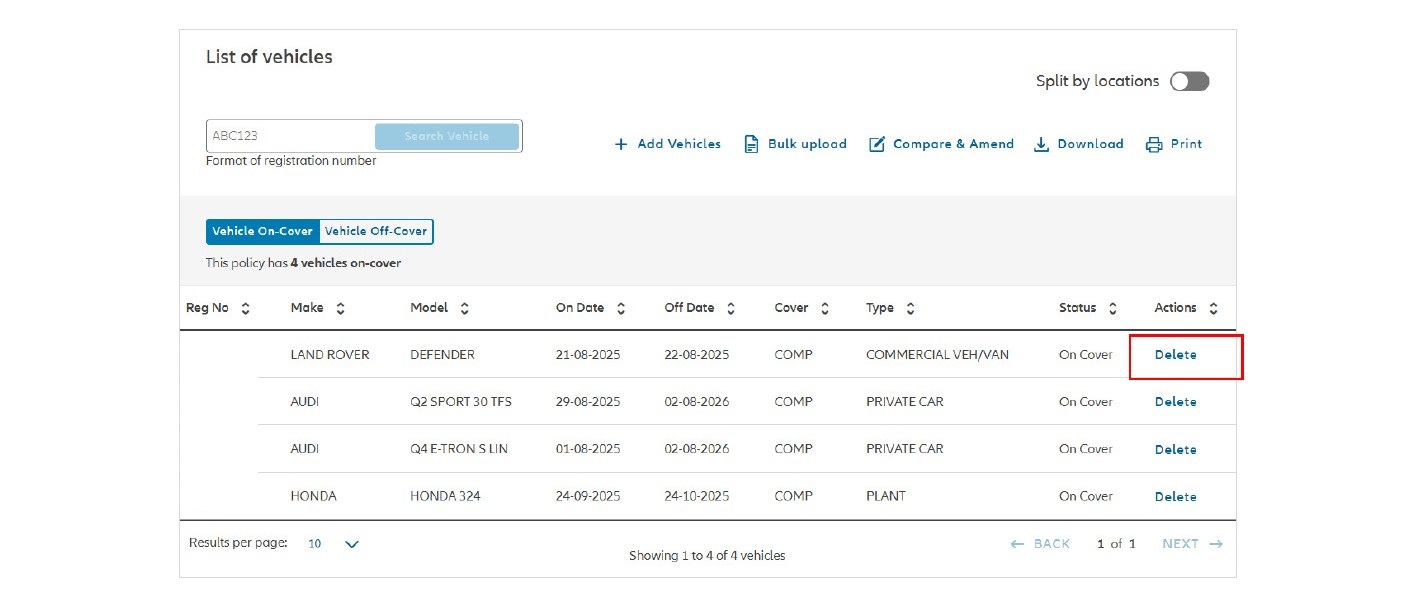
1. On the policy details page click on ‘Delete’ next to the vehicle which needs to be removed.  

list of vehicles

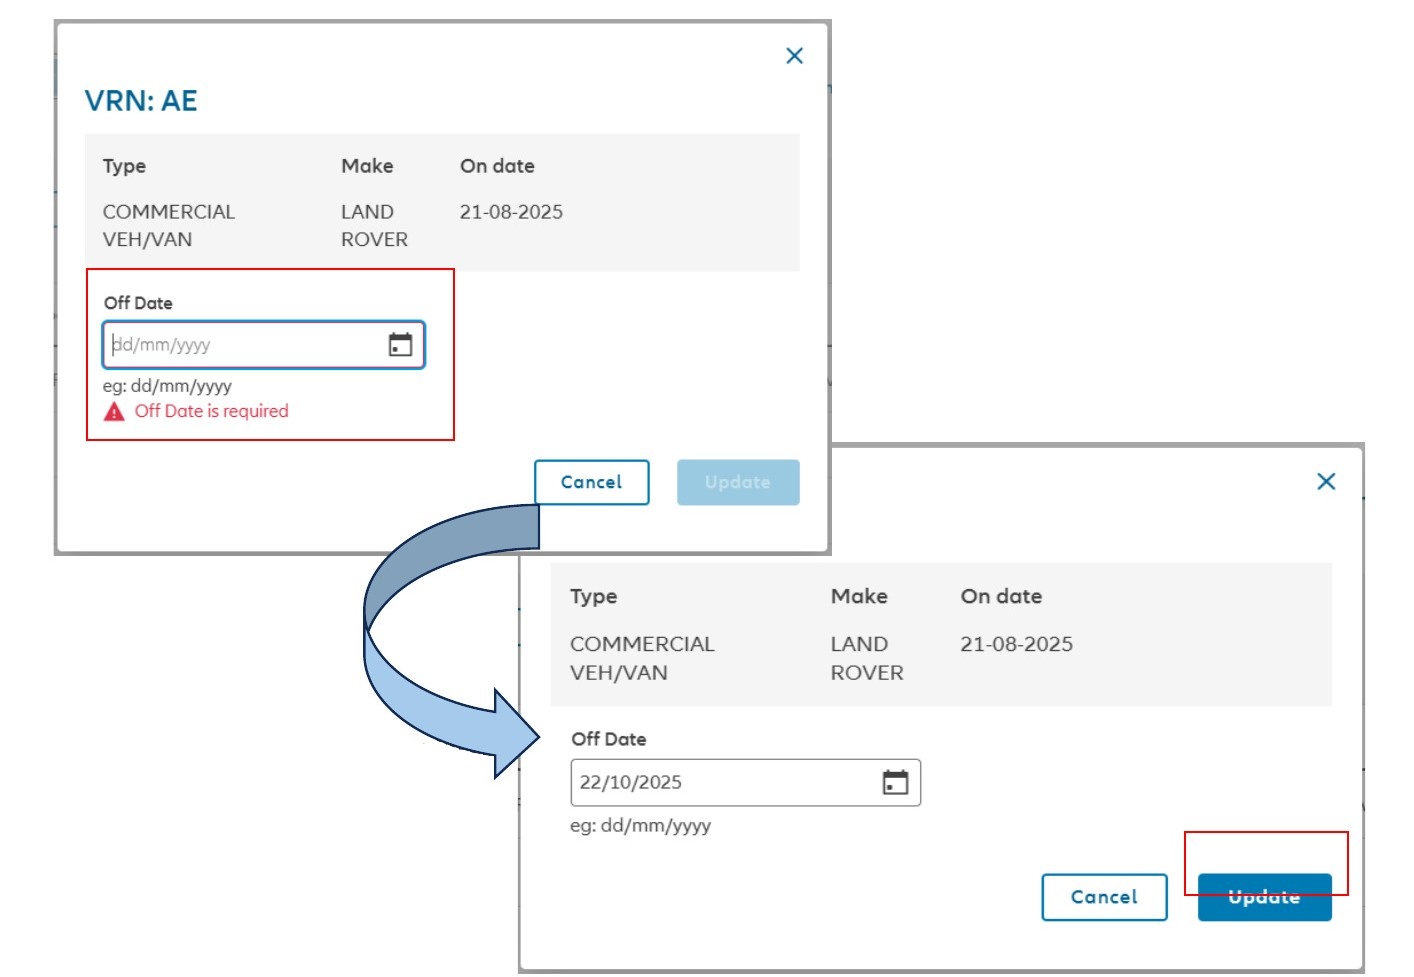
2. Enter the ‘Off Date’ in the highlighted text box, then click ‘Update’.

Note: the same date for on-cover and off-cover can be used. This can be:

-          A single day addition

-          Removal of a vehicle added in error

Note: any further date can be chosen as the off cover date.

update vrn

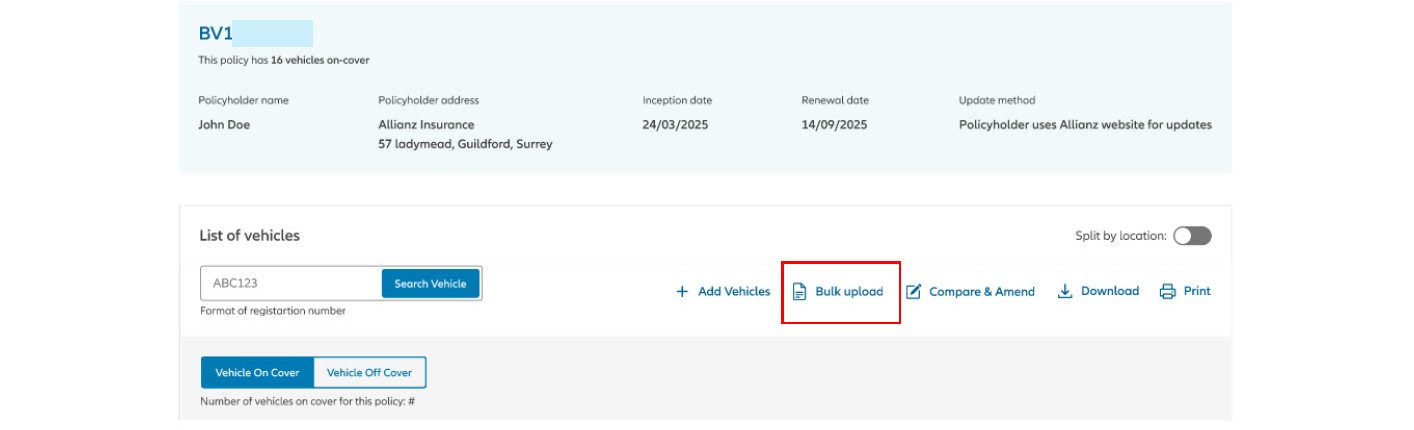
1. On the policy details page click on ‘Bulk upload’.

bulk upload

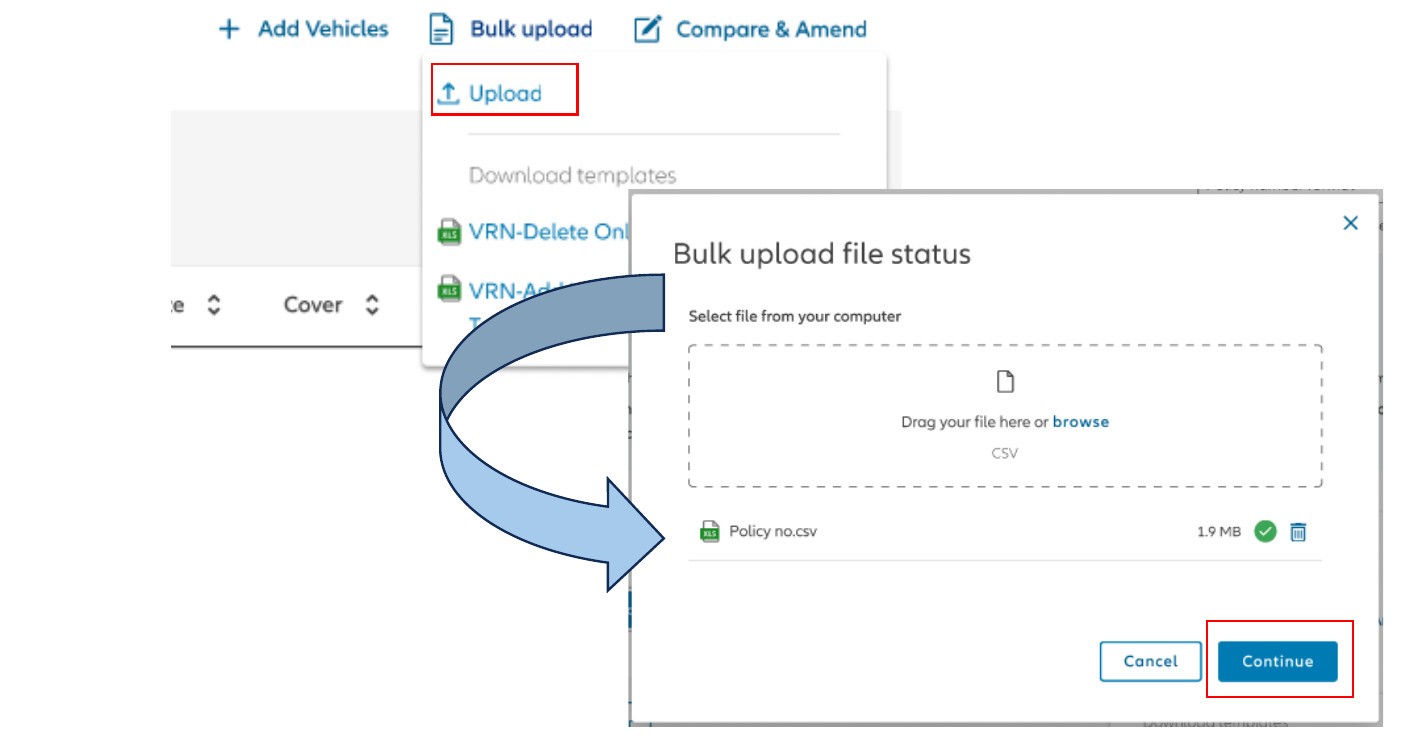
2.Click on ‘Upload’. Drag over the relevant CSV file or click on ‘browse’ to open File Explorer and then upload the file. Then click ‘Continue’.

upload

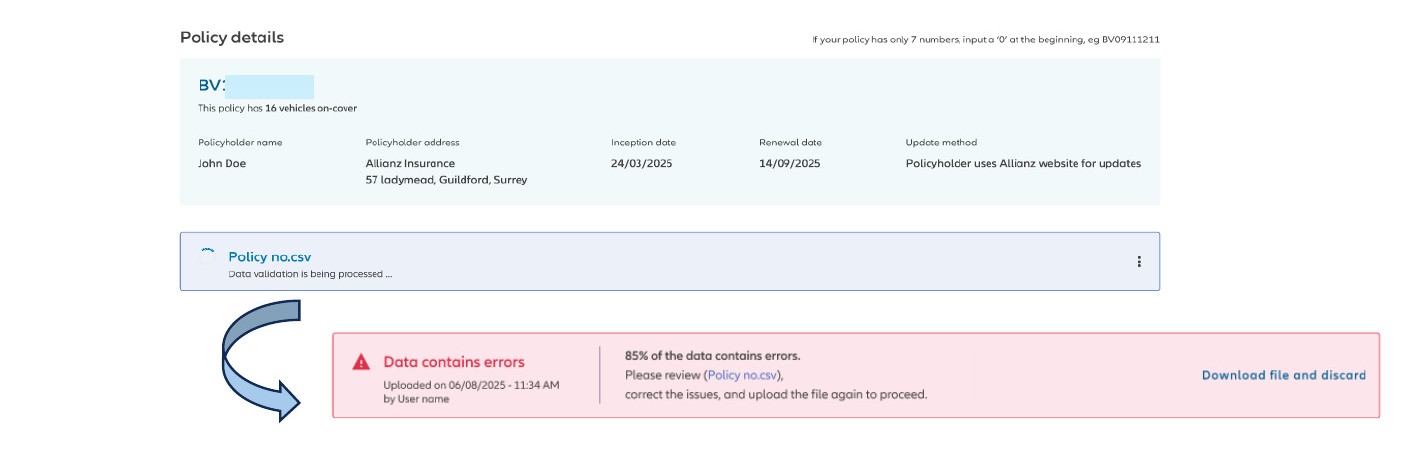
3. The CSV file used for the bulk upload will then be processed by the system and the data will be validated. If the majority of the data contains errors, these will be called out and the user prompted to correct the issues. 

error notification

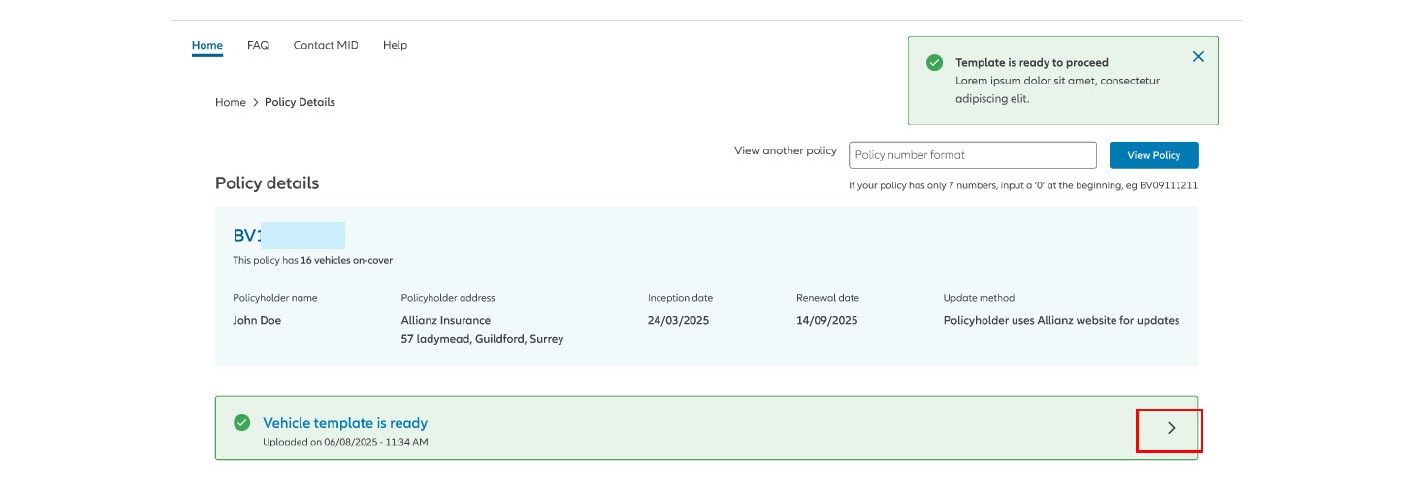
4. Once the vehicle template has been processed and validated the system will provide notification. Click on the arrow to continue. 

template ready

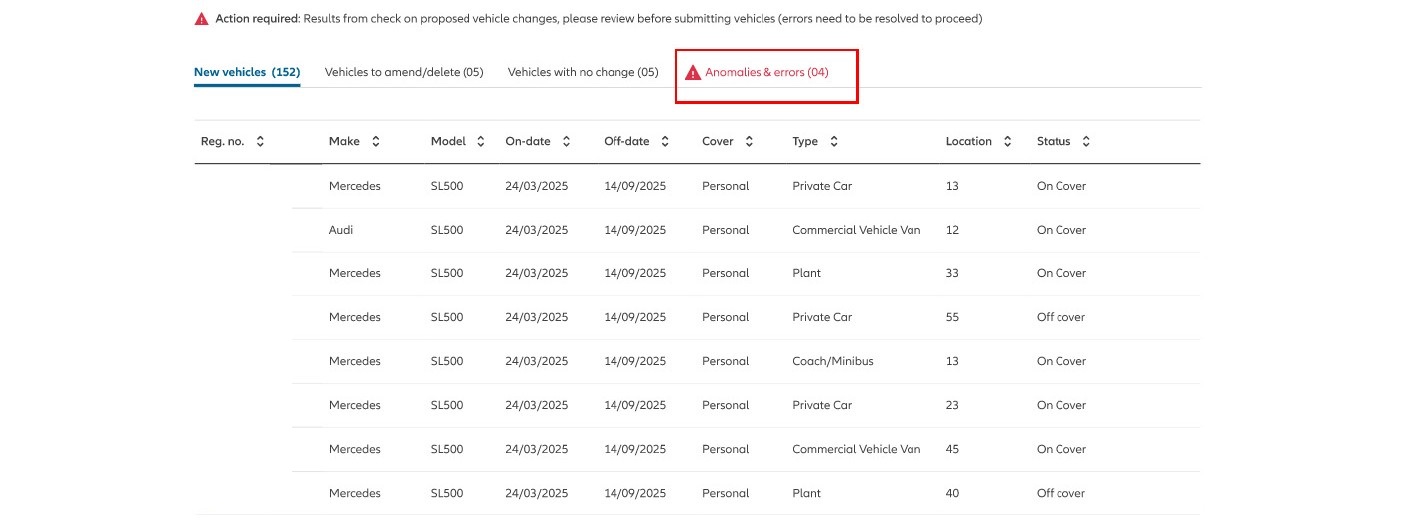
5. The system will then split the vehicles in the bulk upload into four categories. Vehicles which are new, existing vehicles where amendments have been identified, existing vehicles with no changes and any identified anomalies and errors. To progress with the bulk upload any anomalies and errors have to be rectified. Click on ‘anomalies and errors’ to continue. 

error log

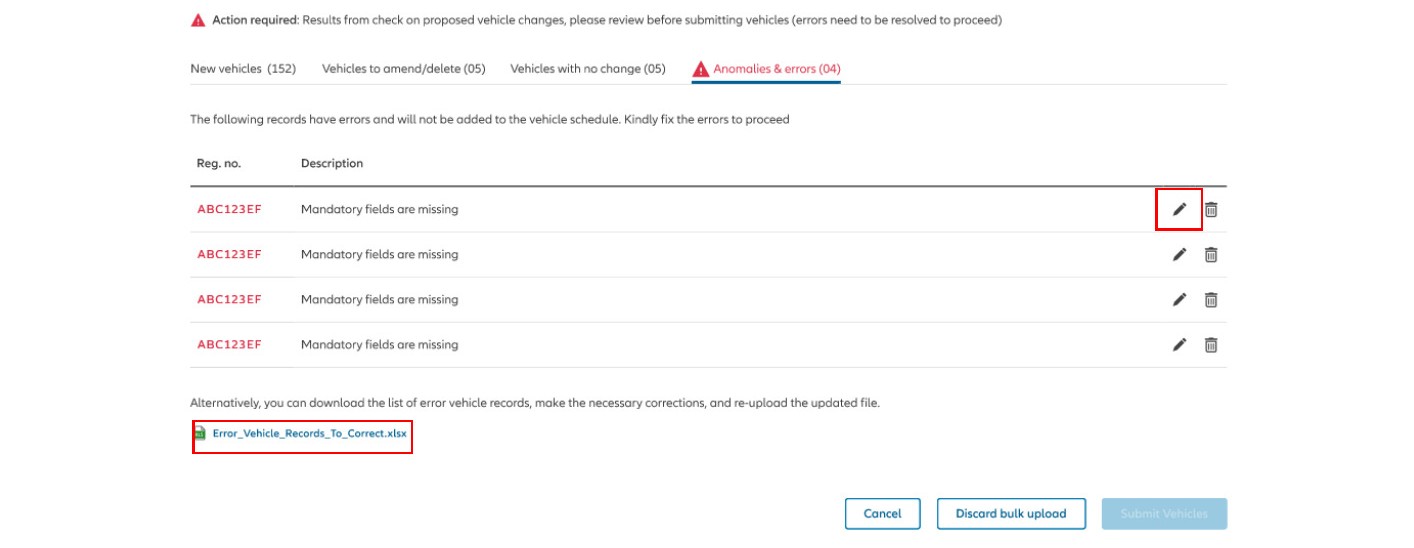
6. On the ‘anomalies and errors’ tab, the system will list out the vehicles where any errors have been identified. These errors can be fixed either on the system, using the edit button, or the system will create an excel file of all vehicles where an error has been identified and this can be downloaded. The bulk upload cannot be submitted until either of these options have been completed. 

fixing errors

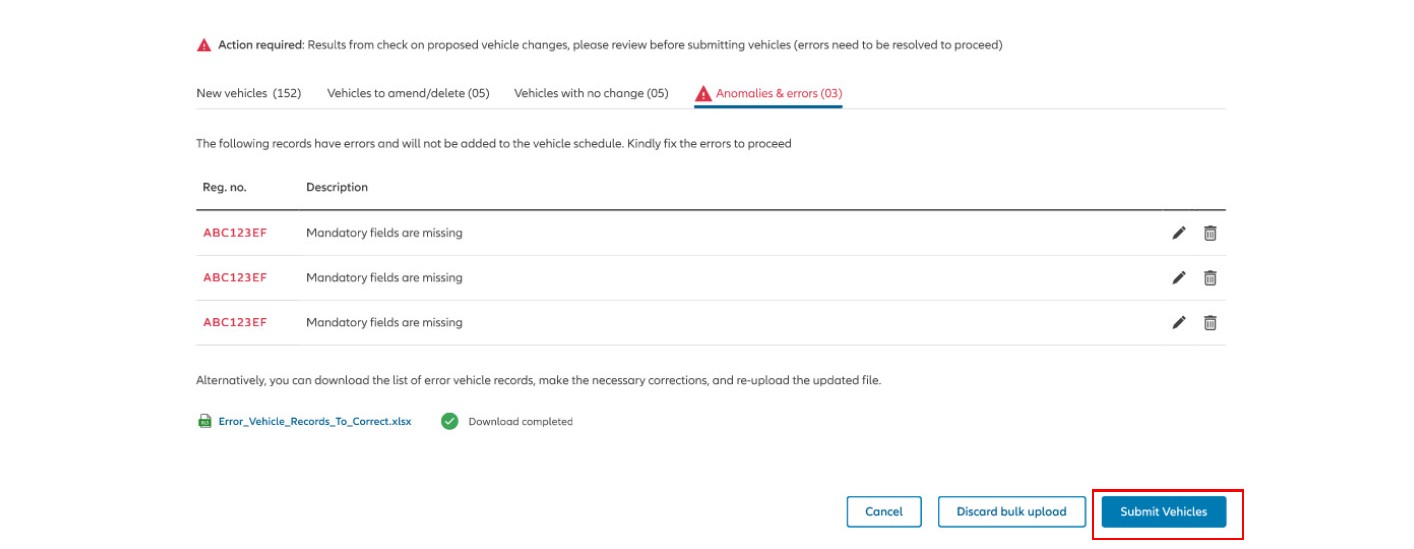
7. Once any errors have been manually edited or the file detailing the vehicles with errors has been downloaded, the bulk upload can be submitted. Click ‘Submit Vehicles’.

Note: if selecting the option to download the error file rather than manually update, any vehicles included in the error file will not be included in the bulk upload. 

submit vehicles

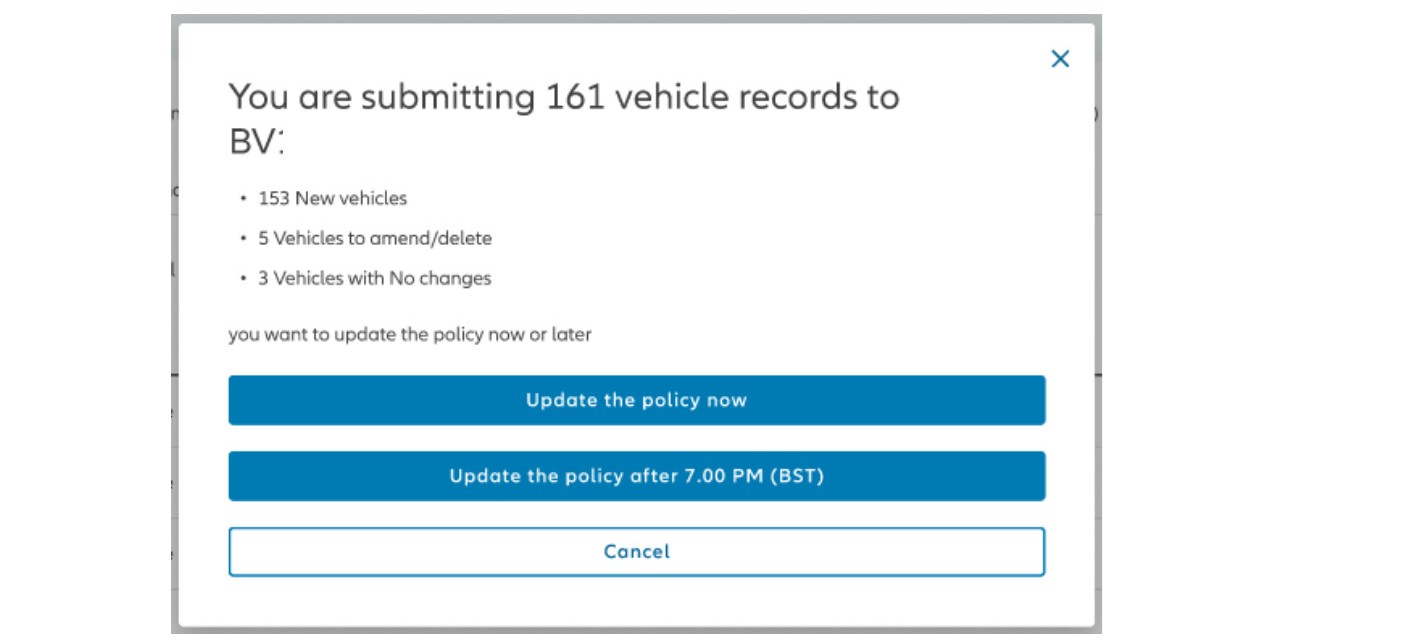
8. The bulk upload can then be submitted. To update the policy immediately select ‘Update the policy now’ or, to schedule the update after working hours, select ‘Update the policy after 7.00pm (BST)’.

Note: larger bulk uploads should be scheduled for after working hours, so the system is not impacted for other users. 

bulk upload

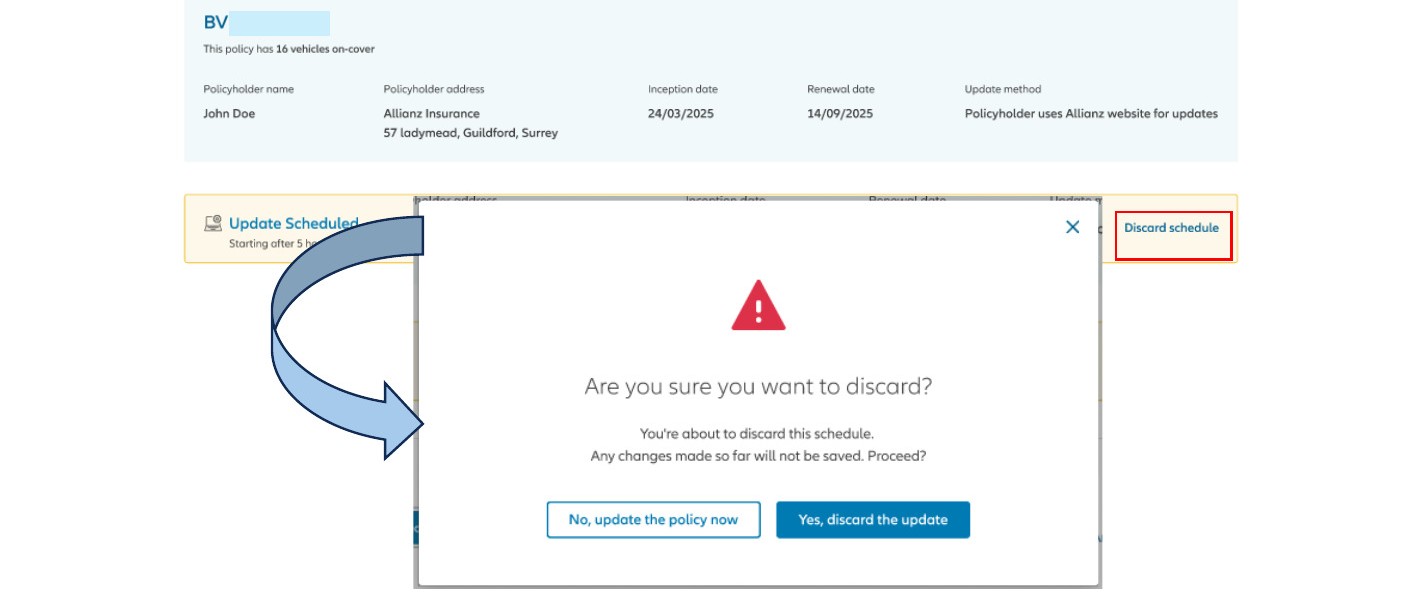
9. If the option to delay the upload until after working hours is chosen, the following screen will show. To cancel this scheduled upload click on ‘Discard schedule’. To change the schedule update to an immediate update click on ‘No, update the policy now’ or to cancel the update click on ‘Yes, discard the update’.

Note: whilst a bulk upload is ongoing another bulk upload cannot be started in the same policy. The CSV templates can still be downloaded. 

discard schedule

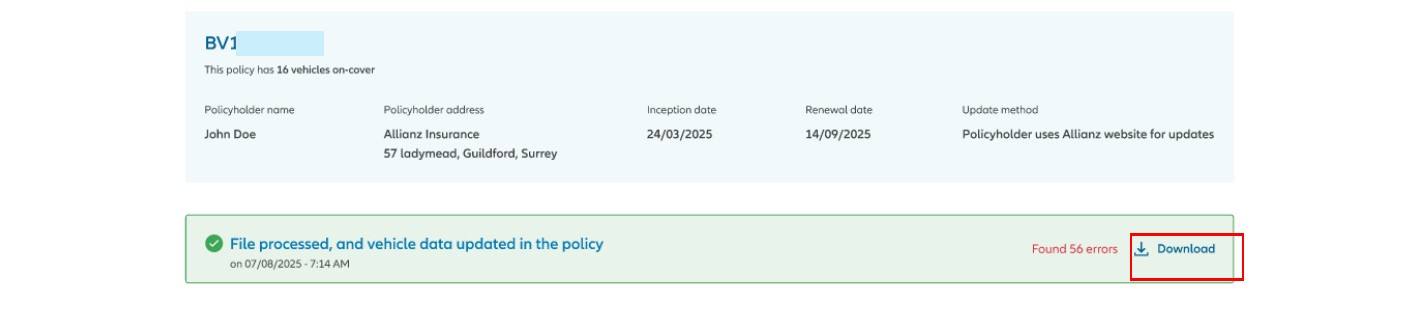
10.Once the upload has been completed the system will show a notification stating that the file has been processed and the vehicle data has been updated. If there are any updated errors found the system will pull these into a downloadable file; click on ‘Download’ to download this file.

Note: if the client does not want to download the error file immediately then the file will remain downloadable in the history until a new upload is started and a new file is uploaded.

download
This promotional material is intended for insurance broker use only and no-one else should rely upon it.
It must not be made available to anyone other than the intended recipient, either in its original form or any reproduction.